Tutorial how to export a uv pass from 3dsmax to remap in postproduction.
In the company I’m working right now it was necesary to create different 3d effects for a mapping. This effects consist on move the actual video projection in 3d in diferent ways.
Normal workflow will be to do the 3d animation and project the video edited over it, but since it was needed on multiple sequences and we was changing editing every day and with huge size template we need to found another solution for reduce huge render times and for a better workflow.
One solution can be import 3d objects in Nuke and remap everything there, but since the company workflow is based on AE it was not a solution. Other solution is to use the recent Andrew Kramer plugin, Element 3d. But has the inconvenient that you can’t import animated 3d models (the solution is to animate inside the plugin), you don’t have raytraced reflections and shadows, and there is no way to import deforming geometry. So the solution proposed was to use a uv map and remap everything in After Effects.
The workflow is simple: Render a 3d animation in your 3d program with a uv map (green and red color corresponding to u and v coordinates), and diferent passes (reflection, shadows, speculars, diffuse,ao,…), go to After effects and with a plugin assign a composition to this uv map. With this we can change the composition in real time and see how its addapted to our 3d geometry inside After effects without re render it. We win in flexibility for editing since we can change on the fly, speed, and more control over the final look.
We have two plugins to use our uv maps inside After Effects: RE:map from RE:vision and Youveelizer from Jerzy Drozda. This two solutions did near the same with very similar options. Re:map incorporate diferent plugins to do diferent tasks as displacement and advanced distortion. But for uv mapping inside AE two options are valid. RE:map is 150$ and Youveelizer is 30$.
Here’s a uv’s sequence I rendered in 3dsmax:

I can replace it with any texture, composition or animation in After effects and it follows the original deformation.

This two plugins are very easy to setup. I have my uv sequence (red and green), with RE:Map UV applied on it. I added the comp I wan’t to composite over and turn it off (comp “logo2″ in the image). Go to RE:Map UV and assign here this comp on “Texture”. And done! we can change things like Tile repetition, position Offset and others. I have a third layer in multiply mode to add lighting information.
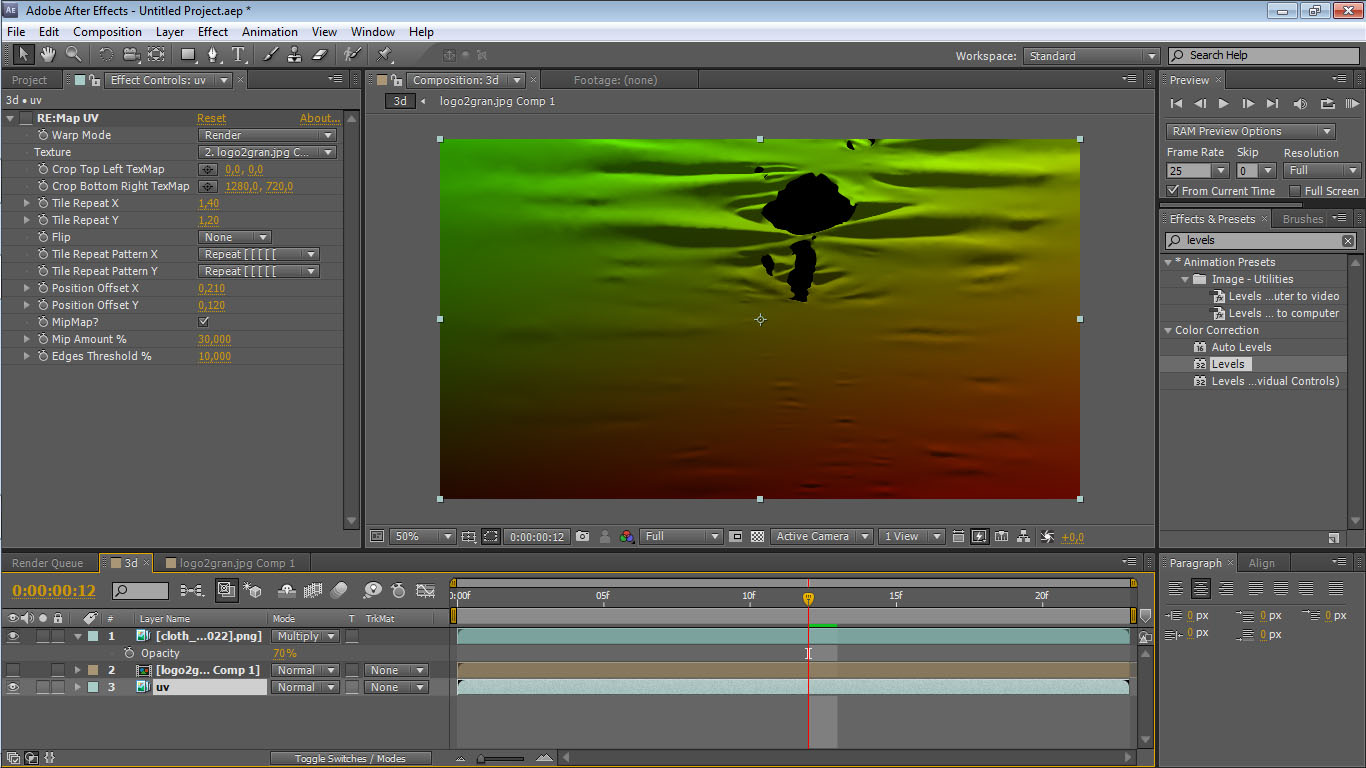
Since uv images need a lot of information, we need to turn our composition as 16bpc or 32. If not your image will be pixelated.
I will not go more in deep with this plugins since they are really very easy to setup, also you can follow this tutorials for Youveelizer, and for RE:Map.
Exporting uv maps from 3ds max
So the setup in AE is very easy, but how we setup and render this uv’s inside 3dsmax? We need to know how to apply our material and setup the render, map our objects, how to and finally how we save this images, here we go!:
Render Setup and materials
We will look how to do this in mentalray and in vray with dedicated maps:
-Mentalray: In mentalray there is a dedicated map to create a uv pass. The problem is that from 3dsmax 2011 and later versions this map is hidden to user, to show again you need to find and edit “3ds max shaders” archive you can find in: C:\ProgramFiles\Autodesk\3dsMax2011\mentalimages\shaders_standard\mentalray\include
Open with notepad and put “#” in front of “hidden” just after gui “gui_max_base_UVGenerator” {
Create a standard material with self-ilumination to “100″ and add the “uv generator” as diffuse map. Apply this map to your 3dsmax objects.
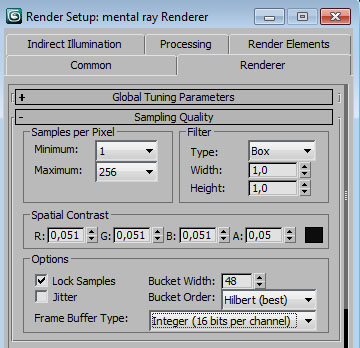
Render configuration: Disable Indirect illumination, on sampling quality minimum to “1″ and maximum to “256″, jitter “off”
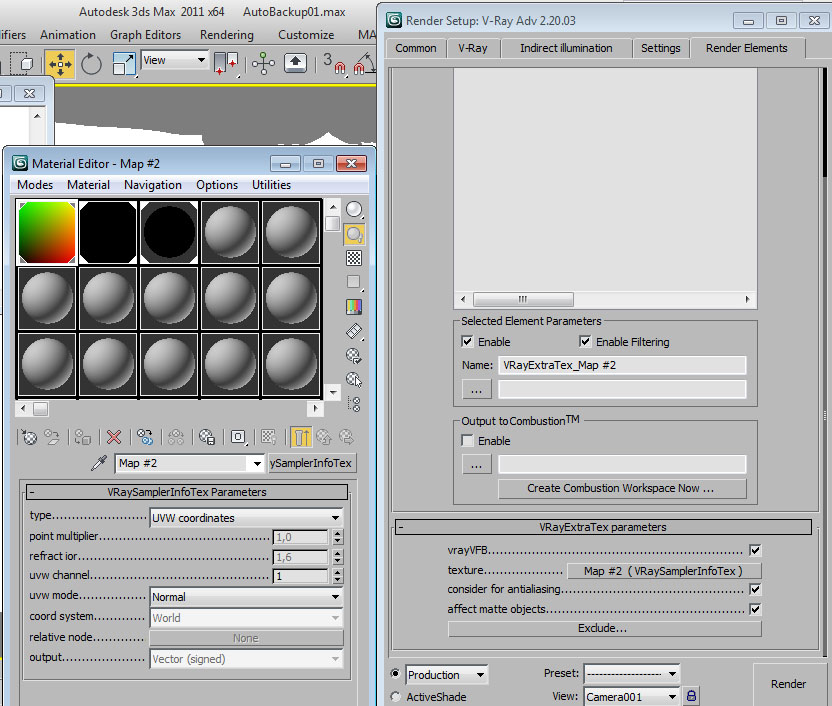
-Vray: In Vray we add a “vrayExtraTex” render element. Create a new “VraySamplerInfoTex” map, and set the type to “uvw coordinates”. Drag this map inside “VrayExtraTex parameters” texture.
Render configuration: If you use Adaptive subdivision set Min.rate to “0″ and Max.rate to “3″. If you use Adaptive DMC use Min subdivs to “3″ and Max subdivs to “4″. After some tests I see this are the lower settings to have a good uv maps.
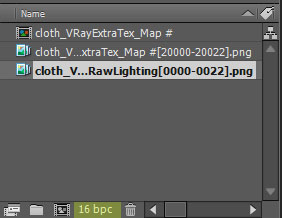
This is to have only the uv’s, also I add diferent passes like illumination, shadows, diffuse,… to add over the image later on AE.
This are the most easy way to create uv pass, but since a uv pass is only a red to black gradient and a green to black gradient, we can create this textures with simple gradients, or using an existing square uv map with large resolution and 16bpc or more applied as texture over our 3d objects
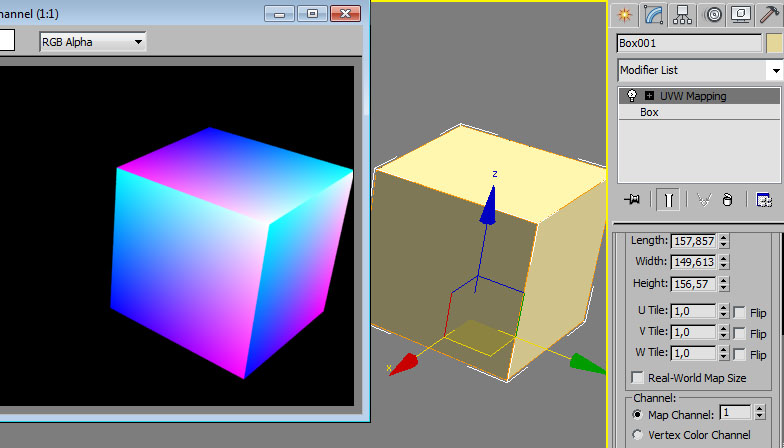
Objects mapping: We can create a uv for the 3d model using uvw maping or unwrap, or a camera mapping.
Here we have three 3d objects with default uv’s from 3dsmax rendered. You see we have the uv’s represented as green and red color. When we apply a composition in After Effects the result will be the right one.

There is no possibilitie to use diferent textures for diferent objects/faces directly in the plugin. But is possible rendering an ID pass from your 3d apication, or doing masks inside AE.
We need “u” and “v” values, so don’t use “w” information, w information will add a third blue color to our pass that is not needed in the uvpass. If you use a uvw mapping you need tur turn “W Tile” to “o”.

This can be useful some times, but I guess that the most useful thing is to use a camera map projection. With a camera map projection our mapped scene will be exactly the same as our original comp in AE in the first frame, without any jump or glitch from original comp to remaped one. Can be used to create 3d transitions or add some 3d effect on certain part of the video.
In this example I camera project the uv’s on this cloth, so the uv’s are pure red on bottom right, and pure green on top left side of the render, with this the image in first frame will be exactly the same as our original comp.
Some things to think when we use camera map projection for uv pass:
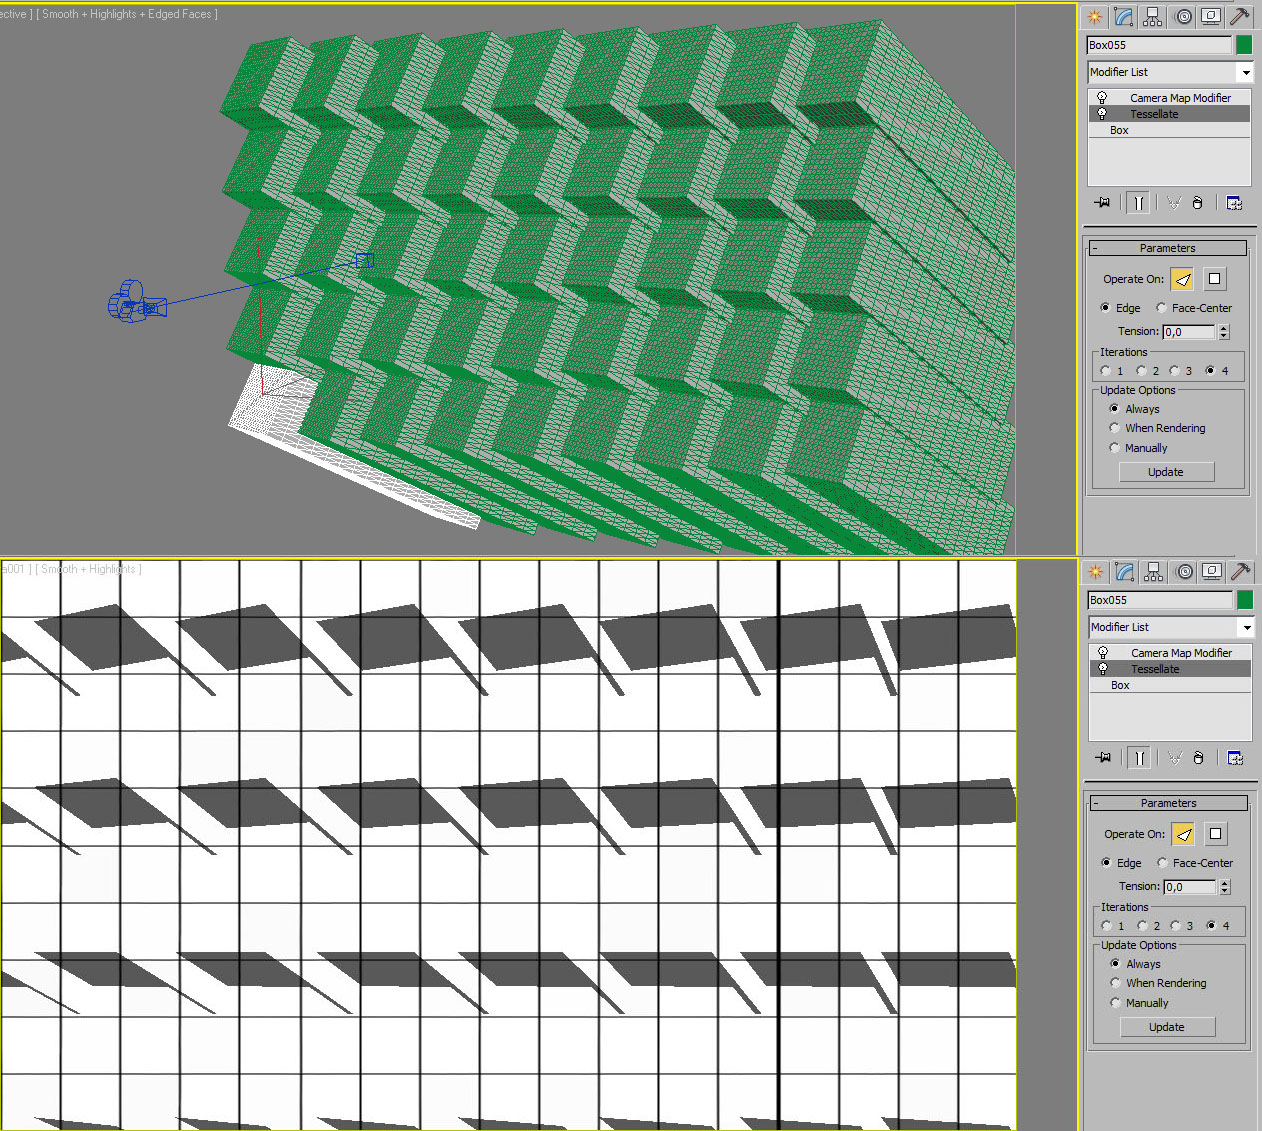
-Remember that camera map projection calculate the final map using interpolation between vertexs. So if you have a 3d object to map without a lot of vertices create more vertices on it. This can be done easy with a “tessellate” modifier without tension. Also is good idea before render the uv pass check that your uv is correct using a “Tile” or “checker” material over your objects. Is not easy to see if your uv is wrong or not just watching a red and green gradient!
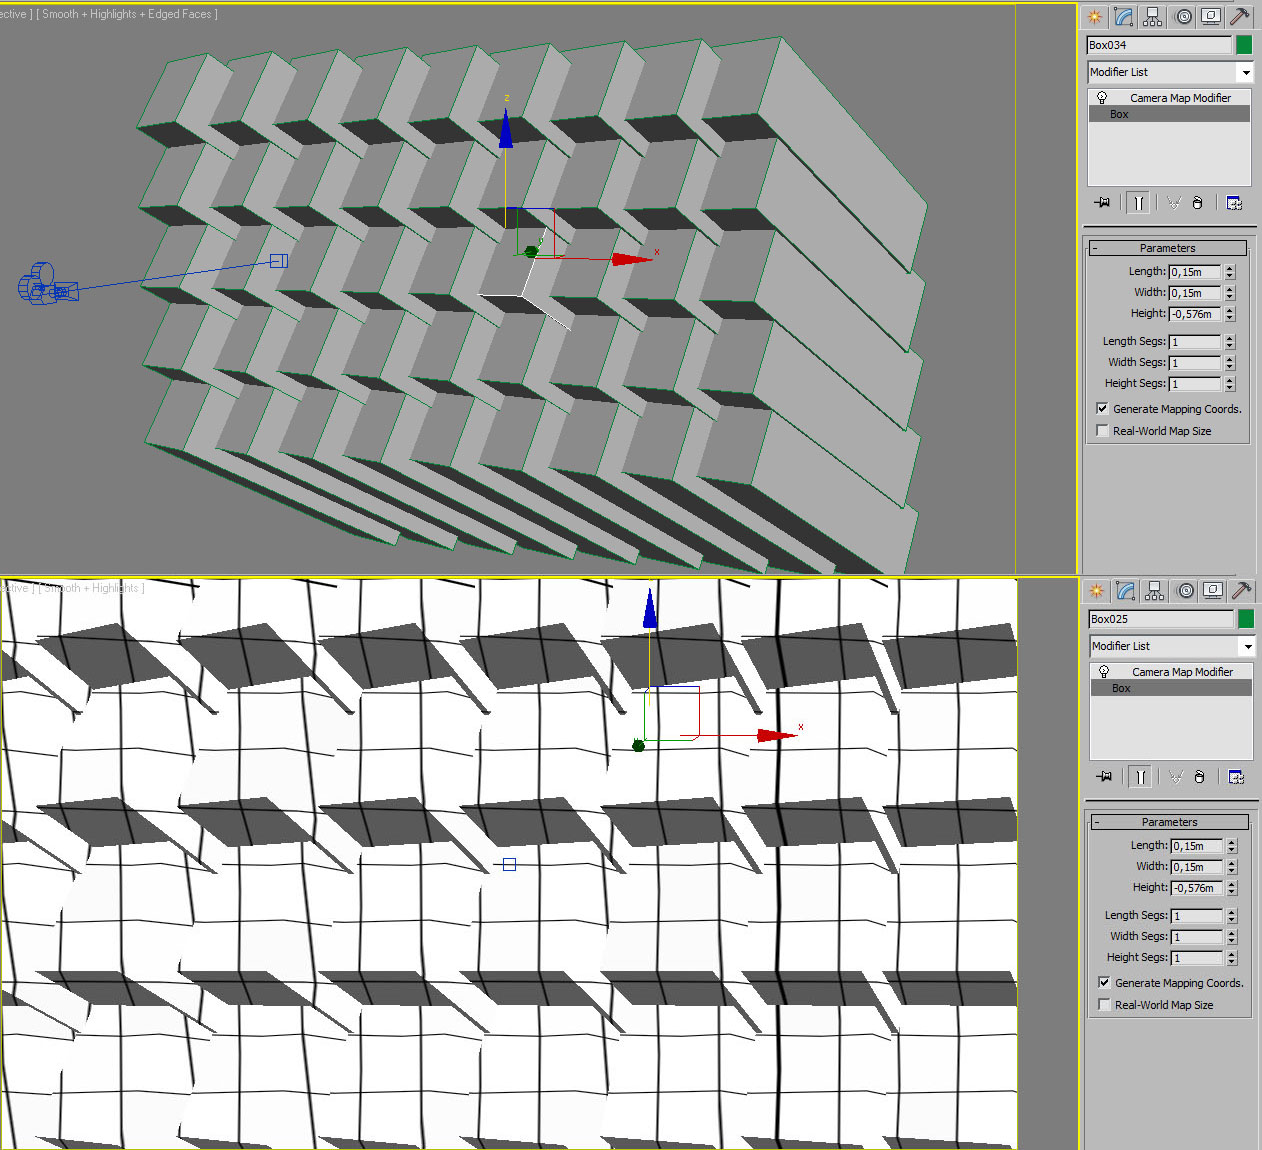
As you can see here we have 3d objects without subdivisions, if we apply a tile material and wach from camera position, lines are not completely vertical and horitzontal. If we render this with the uv map, when we appy remap plugin over it we will see a distortion. Add more vertex and problem solved!
Tip: In 3dsmax you can’t apply camera map modifier to multiple objects (or over an instance object), so it’s a pain in the ass if you have a lot of objects. The solution is “CameraMapApplier” from BlurScripts. What? you don’t have installed BlurScripts page? ok, no panic, but before read more, go to BlurScripts and download them. Are old (listed for 3dsmax 4) but works with all 3dsmax versions (tested on 2013), and are a must have!
As alternative I use a lot camera map operator in Thinking particles, configuration is simple:

Save: Last step is to save our uv pass, but it’s also very important to do it right. Save your uv map as 16 bpc image. You can use any format that suports this feature, I use png sequence with 48 bit colors. Make sure to turn off gamma correction!
